Rolo Slider Documentation
Description
Rolo Slider is free image slider with ken burns effect, which lets you create beautifull slides with animatable text layers
Download Rolo SLider from wordpress.org:
Browser Support
Rolo Supports All modern Browsers.
Getting Started
Note: All of the plugin files are in the src directory (this includes both the JavaScript and CSS files). If you want to see an example page with all of the files included, look in the demos directory.
To add Slider, go to Rolo Slider and click Add Slider
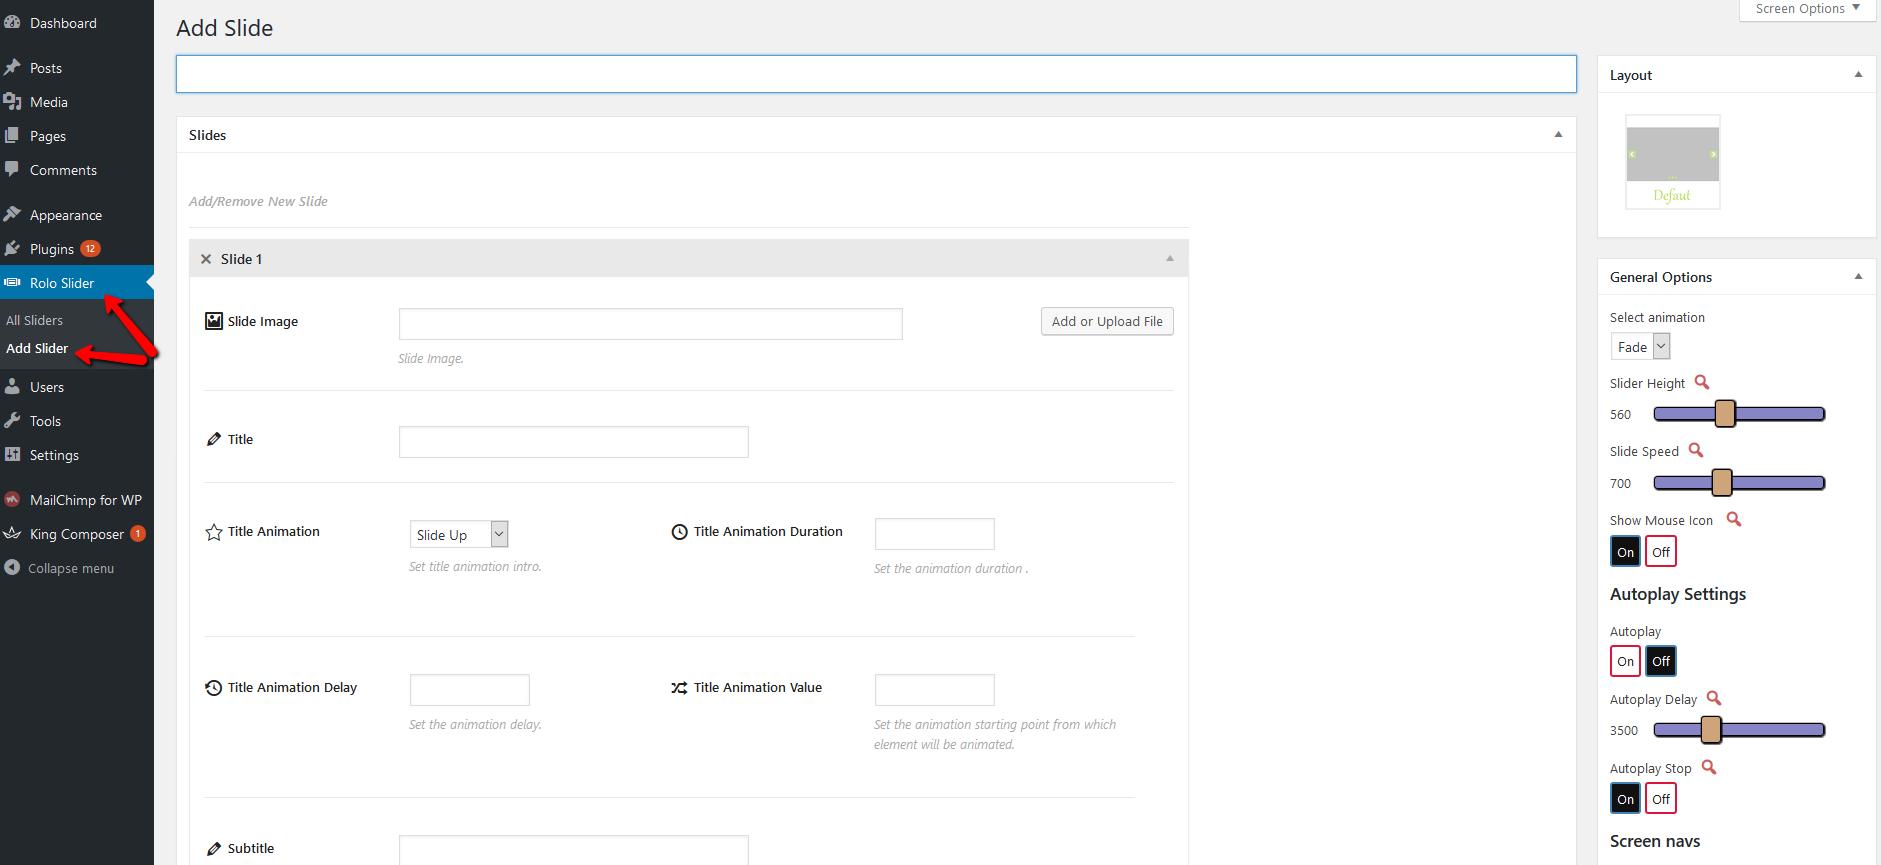
New page will be opened. There you will be adding new slides in few clicks.
Options
All options are self explanatory. Next to every slider option you have a dedscription that will be opened in popup when the zoom icon is hovered. We will give some info about the individual slide options here.
Slide Options
| Name | Description |
|---|---|
| Slide Image | Add an image to the slide. |
| Title | This is the Title layer - the biggest one in the slide. |
| Title Animation | Choose the entrance animation of the title layer. |
| Title Animation Duration | Choose how long will entrance animation of the title layer last (in milliseconds). So number you enter will represent ms, for example if you enter 450 it means animation will last 450ms |
| Title Animation Delay | Choose how long will pass after the new slide has finished transition till entrance animation of the title layer will appear (in milliseconds). So number you enter will represent ms, for example if you enter 450 it means layer entrance animation will be delayed for 450ms |
| Title Animation Value | Set the animation starting point (it will be calculated in px). This represents the place from which layer will be animated. So for example if you choose Slide Up, as layer animation the value you enter here will be the bottom position from which layer will be animated up. So if you set 60 here, then starting point of this layer will be 60px from the bottom and it will slide up for that 60px when animation starts |
| Subtitle | This is the Subtitle layer - the one which is smaller then title approximatelly by 1/3. |
| Subtitle Animation | Choose the entrance animation of the title layer. |
| Subtitle Animation Duration | Choose how long will entrance animation of the subtitle layer last (in milliseconds). So number you enter will represent ms, for example if you enter 450 it means animation will last 450ms |
| Subtitle Animation Delay | Choose how long will pass after the new slide has finished transition till entrance animation of the subtitle layer will appear (in milliseconds). So number you enter will represent ms, for example if you enter 450 it means layer entrance animation will be delayed for 450ms |
| Subtitle Animation Value | Set the animation starting point (it will be calculated in px). This represents the place from which layer will be animated. So for example if you choose Slide Up, as layer animation the value you enter here will be the bottom position from which layer will be animated up. So if you set 60 here, then starting point of this layer will be 60px from the bottom and it will slide up for that 60px when animation starts |
| Description | This is the Description layer where you can add longer text |
| Description Animation | Choose the entrance animation of the title layer. |
| Description Animation Duration | Choose how long will entrance animation of the Description layer last (in milliseconds). So number you enter will represent ms, for example if you enter 450 it means animation will last 450ms |
| Description Animation Delay | Choose how long will pass after the new slide has finished transition till entrance animation of the Description layer will appear (in milliseconds). So number you enter will represent ms, for example if you enter 450 it means layer entrance animation will be delayed for 450ms |
| Description Animation Value | Set the animation starting point (it will be calculated in px). This represents the place from which layer will be animated. So for example if you choose Slide Up, as layer animation the value you enter here will be the bottom position from which layer will be animated up. So if you set 60 here, then starting point of this layer will be 60px from the bottom and it will slide up for that 60px when animation starts |
| Button 1 Text and Button 2 Text | This is the text for the buttons |
| Button 1 URL and Button 2 URL | Set the hypelink for the button. |
| Buttons Animation Duration | Choose how long will entrance animation of the Buttons layer last (in milliseconds). So number you enter will represent ms, for example if you enter 450 it means animation will last 450ms |
| Buttons Animation Delay | Choose how long will pass after the new slide has finished transition till entrance animation of the Buttons layer will appear (in milliseconds). So number you enter will represent ms, for example if you enter 450 it means layer entrance animation will be delayed for 450ms |
| Buttons Animation Value | Set the animation starting point (it will be calculated in px). This represents the place from which layer will be animated. So for example if you choose Slide Up, as layer animation the value you enter here will be the bottom position from which layer will be animated up. So if you set 60 here, then starting point of this layer will be 60px from the bottom and it will slide up for that 60px when animation starts |
| Layers Horizontal Position | Left | Center | Right . Choose the horizontal alignemnt of the layers inside the slides. |
| Layers Horizontal Position | Top | Middle | Bottom . Choose the vertical alignemnt of the layers inside the slides. |
Integration
And after you have finished adding new numbers and setting the color options, you can insert them into post or page. So go to the page you want to insert the slider you created, from the WordPress editor click on the Rolo Slider shortcode:
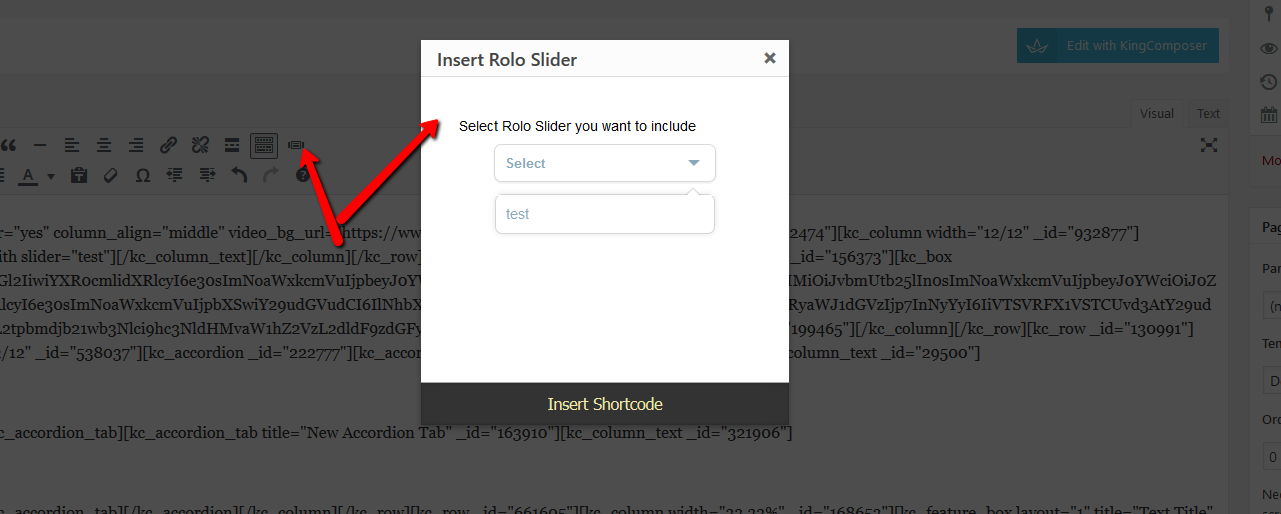
Then select the section you want to insert and click on Insert Shortcode.
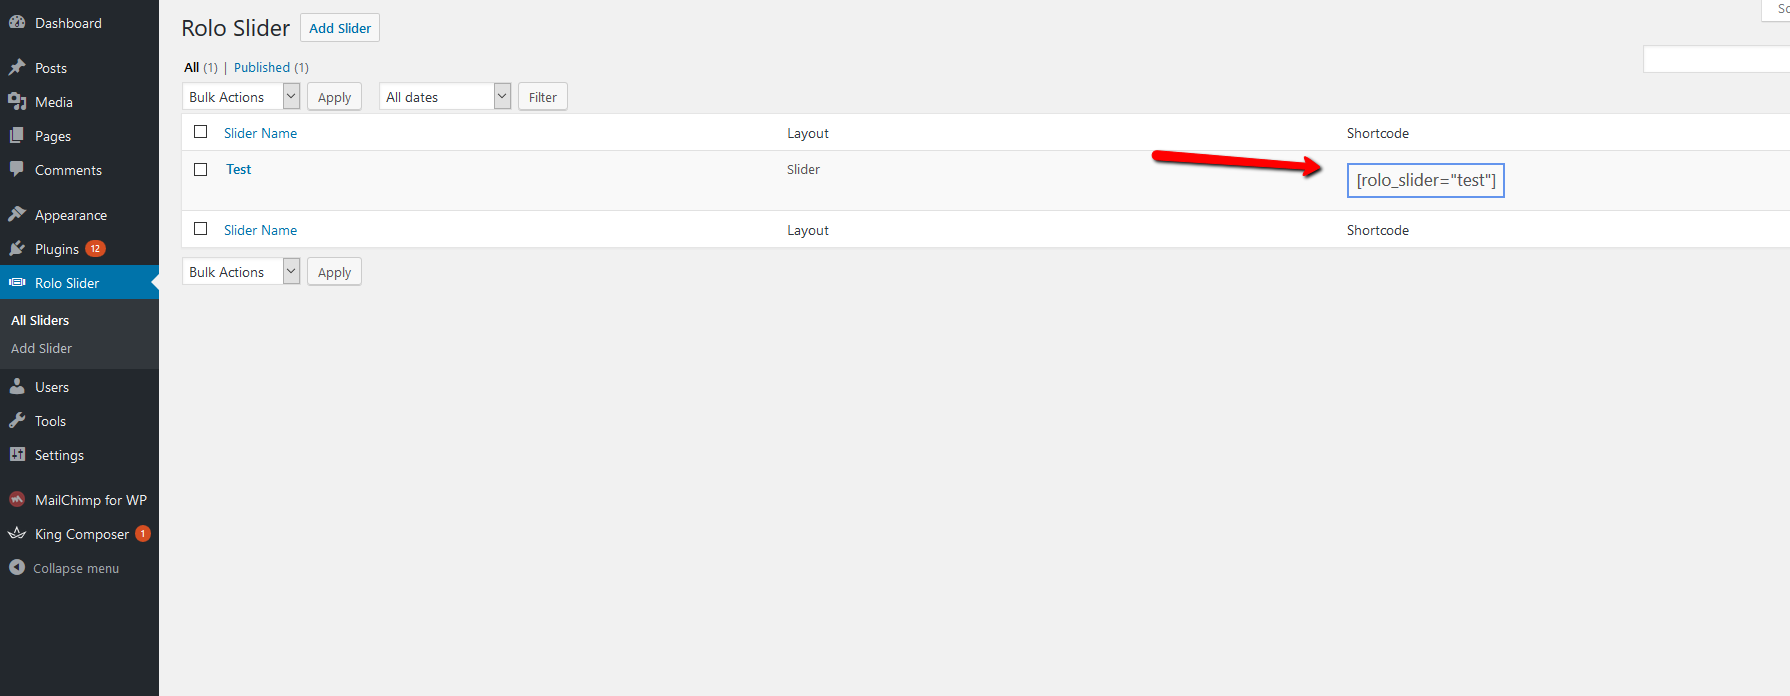
Or you can manualy insert the shortcode, by going to All Sliders, where you will see the list of all numbers sections you created. On the right you will see shortcode, just copy it, and paste into post or page where you want to include that section.
To insert the slider into the page template inside your theme files, paste the provided shortcode inside the do_shortcode('[rolo_slider="SLIDER_NAME"]'); function call.
Example: to insert the above test slider, you would add this function into page template:
// Add Rolo Slider named Test into the theme file
<?php echo do_shortcode('[rolo_slider="test"]'); ?>
Extending
Coming Soon
Copyright
Copyright © 2016 Pressfore